please vote and i will make the most popular item this week! :)
Tuesday, November 1, 2011
recommendation: bake with leftover candy
Monday, October 31, 2011
recommendation: more halloween decorations!
boo! its halloween and now that I have a little time on my hands, I decided to get into it this year. you already saw my front door display, I also got some cheap leaf bags at big lots (3 for $1.99) that are decorated as a pumpkin, Frankenstein and a ghost. they are supposed to glow in the dark but as they were cheap, they won't work. but trick-or-treating in ann arbor is while its still fairly light out from 5pm - 7pm, so I think kids will get the point.
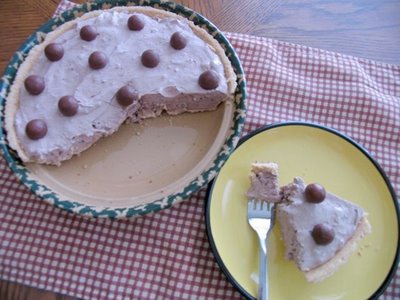
speaking of not working, i also tried two new recipes. obviously both are from pinterest, no surprise there. the thing i'm finding with pinterest is that it LOOKS pretty, but it doesn't always taste pretty. pinterest is eye candy - not tried and true recipes, not must try or tastes great, but if it looks pretty, it gets repinned. sometimes its ok, you can get away with that, but today I tried making cheesecake brownies - my first attempt at making anything cheesecake (I'm not a cream cheese fan. if you are thinking what do i put on my bagel, its butter). It was a total flop. Perhaps it was because I was following two recipes 1) the girl who ate everything's scream cheese brownies 2. Betty Crocker Scream Cheese Swirl Brownies instead of just one. But I followed instructions. I think I over baked it - edges were hard as a rock, middle was flaking apart as I cut it. I tried but in the end, it went to the trash bin. I think these recipes were user error though, not the recipe itself.
My second pinterest recipe was lemon sugar cookies in the shape of candy corn from Kathie Cooks. I hate candy corn but think it looks awfully cute. They were a little dry so I cooked the second and third sheets a little less and they are pretty decent. I mean, I secretly ate 3 in a row, so obviously they are edible and maybe even yummy. They turned out so much tinier than I thought, but it ended up being perfect because I stuck them in a mason jar and they look adorable! These are for my hubby to take to work - they are having a bake off. This recipe is no winner but the cuteness factor is there so I'm ok with not getting a prize. (now seems like a good time to mention that I won the cake contest in elementary school 1st - 5th grade. i'm not really bragging, i'm just stating cold hard facts here. this is also the reason why I'm ok not winning future bake offs, because I've already proved my awesomeness. here is also where i thank my mom because she pretty much did all the work, i just decorated the cakes.)My victory of the night was my pumpkin carving session. We picked up a pumpkin at a pumpkin farm up north, as seen in my pumpkin display picture, its big and orange but what you may not be able to see is the detail around the handle of it, there are little curly cue wispy branches and they are cute and magical and I didn't want to cut the top open so I even thought about not carving it. But I really wanted to try out the Martha Stewart polka dot pumpkin, so I went to the tutorial and... she carves the bottom out - how perfect!!! It was actually quite easy, no different from taking the top off. So my top stayed intact, I used a power drill... because any excuse to get a tool in my hand makes me feel like a good homeowner. Same with the hubby, he practically walks around with a screw driver and hammer in his pocket. He's becoming quite handy! OK but anyway, I used a power drill, the 1/4 and 3/16 bits, drilled holes down the "seams" of the pumpkin, and ta-da! A beautiful polka dot pumpkin that I just l.o.v.e.
the other thing that turned out great, was my milk jug project inspired by blogger eighteen25. My mom and mother-in-law donated most of my jugs as we don't consume very much milk (apple cider jugs work too!). They were easy to make, I finished in less than an hour, and I think they are going to look adorable lined up against our garage door! the trick is using christmas lights instead of candles to light them up.
Can't wait to get trick-or-treaters tonight. Hope it stops raining. Happy Halloween!!!
Thursday, October 27, 2011
recommendation: cooking for others
I came across this great blog post, Cooking for Others, A Guide to Giving Sympathy Meals, and loved it. whenever someone is under the weather or just out of the hospital with a new tiny family member, I think its really helpful to bring a meal or some kind of food gift to them during your first visit. When you are sick or recovering or have your hands full, cooking can be quite the task (as we all know it can be a lot of work even when you are feeling great and don't have your hands full!!!).
We just received the most delicious coffee cake from our neighbors to welcome us to the neighborhood. It was such a nice treat and I think really thoughtful of them. Baked goods work great for someone you don't know as well but want to give something to. It shows that you thought of them and baked goods are enjoyed by most people so its a good choice, just watch out for nuts in case of any allergies if you don't know the person as well.
When it comes to cooking a full meal, this works better if you know the person and their tastes and likes/dislikes. My go-to dishes for friends with babies are my mom's baked rigatoni recipe (non-veg) or Kraft's stuffed shells (veg) because they are both quick and inexpensive for me to make, easy to make a double batch so you get a meal out of it too, both freeze well, and everyone loves pasta!
stuffed shell recipe:
find it here
1 lb Ground Italian Sausage (sweet or spicy)
6 cups of spaghetti sauce (although I like to put more in, have 2 jars on hand just in case)
12 oz Rigatoni
3/4 c Parmesan Cheese
4 oz package (2 c) shredded mozzarella cheese
Cook and drain the rigatoni. Brown the sausage, crumble, drain. In a 2 quart baking dish, combine sausage, sauce, noodles and parmesan cheese. Mix well. Top with mozzarella cheese. Freeze or bake at 350 degrees for 30-45 minutes. Yields 4-6 servings
Notes:
* I've been doing half a pound of sausage lately because I don't like as much meat in the pasta and its cheaper but if you love sausage, follow the original recipe!
* Paul Newman Marinara works well for this recipe
* if freezing, leave mozz cheese out of dish, top with foil. add mozz when you are ready to cook!
* this is a great recipe, the shortcut version of it, is buy Mids Italian Sausage meat sauce, and mix that with cooked pasta, and top with mozz (so skip the parm, skip the browning of sausage) - pretty close in taste and super quick - baking it for 20 min to brown the cheese makes it seem like you put a lot more into the dish than you did!
Ideally, sympathy meals are:
- easy to transport
- easy to eat
- hold well
- freeze well
Ideas that meet this criteria are:
- Soups & Stews: chili of all types, hot nourishing soups, hearty stews, chowders
- Crockpot/Slowcooker meals: Spaghetti sauce, Pulled pork/chicken (accompanied with slaw, and buns), chicken cacciatore, chicken curry
- Casseroles: Lasagna, Macaroni & Cheese, Chicken Devon
- Sauced Meals: Chicken Parmesan, Meatballs & Sauce, Ribs, Meatloaf
Don't Forget:
- Always include heating instructions
- Try to use disposable containers that are oven friendly so that the receiver doesn't have to worry about getting the dish back to you
- Make it something easy for them to make so that they don't have to spend a lot of time prepping the meal, that defeats the whole purpose of giving it
- Make it a complete meal - I normally send a bag of salad along with my pastas. Side dishes are great and don't have to be anything fancy - a tub of pasta from the deli section at your grocery store, a can of baked beans, a bag of salad, frozen garlic bread, a steamer bag of veggies, etc.
Happy Meal Giving!
Monday, October 24, 2011
recommendation: art class in chicago
So this place is called Arts N Spirits and basically its a BYOB class that you can sign up for with your friends, there are limited seats per class, and each class has a picture theme so look at the calendar to pick out which one you want to do, you can do your own but its best to follow along with the teacher as she walks you through each step of the layered painting. The class takes about 2.5 - 3 hours (they say 2 but it took longer) and they blast fun music and you drink wine and paint your heart out. The class costs $25-$40 depending on which one you do, and when you sign up, make sure to let them know if you are with other people b/c they semi-assign seats. You get to pick out a cute apron and they give you a canvas, easel, paint and paintbrushes (and bins of ice to keep your vino chilled). We met our friend Lindsey there and there was ample time in between painting and breaks to chit chat. It was a fun girls activity! (there was one boy in the class and I was under the impression his girlfriend made him go but he was a good sport about being there in a room of giggling girls).
Our class did peacocks and in the end I may have done the picture a little different (I think my bird needs feet and definitive wings so he doesn't look like a bowling pin sitting in the middle of beautiful feathers), but it was so cool to walk out of the class with a canvas painting that I made! that looks decent! my sister decided to revise hers a little at the very end into a vase with hydrangeas (after we took the picture). the cool part is, the teacher tells you what to do step by step, but all paint colors are out so you can do your own colors to match a space, some drunk girls at the end decided to put bow ties on their peacocks.
it was an awesome night, and awesome painting, and definitely on my must do in chicago list. check it out!
Friday, October 21, 2011
recommendation: when you find something you like, buy it
i can't emphasize how important this phrase is - repeat it, and memorize it. when you find something you like - BUY IT. ok, now let me give you the rules (you didn't think I was giving you permission to buy any and every-thing you wanted?!?)
1. this does not mean buy everything you see that you like2. this does not mean be stupid with your wallet. spend smart!
3. this DOES mean, when you see something that is hard to find, unique, or memorable, buy it
examples:
a souvenir on a trip. there is nothing worse than seeing something great, but deciding its too early in the trip to get it, and you figure you will see them everywhere, and then you never see one just like it again. and you regret not buying it the rest of the trip. this literally happens to me every.single.time. i go to india. just buy it when you see it.
if it is a hot summer day and you wander in to nordstroms and they are having their huge annual summer sale and you find this fantastic pair of tall brown boots with the perfect heel that are comfortable and 50% off but meant for fall which is months away, but you know you will wear them and need them and love them.... buy it. (true story, and they are well worn)
you find something that just makes you happy. we were in san francisco on a girls trip and popped into St. Helena Olive Oil Co. to browse while we were waiting for our lunch reso at Rutherford Grill (same restaurant group that owns Bandara in Chicago! at either, i recommend to try the cold queso dip, the veggie platter, the a la carte enchilada, or the hacked chicken salad). St. Helena Olive Oil has little bowls set out at every single table so you can taste every single product, its pretty awesome, especially when you are hungry and have been wine sampling all morning. I'm happily dipping away when I strike - the Butternut Squash Pasta Sauce. It is not at all what it looks like. I mean when I think of butternut squash i think yum, but when I think of butternut squash as a pasta sauce, it just doesn't seem like it would translate well, but this one does. i almost walked away from it - how to transport a glass jar of sauce back in my suitcase? $12 for pasta sauce? i don't really need it. am i just buying because i'm hungry? but after circling around it like a hawk for the next 10 minutes, i decided to go with it - because when you find something you like and it just makes you happy (and refer back to rule #3 - its unique, not easy to find, and it will remind me of my trip to SF) - you BUY IT.shop smart, no regrets!
p.s. and it was worth it. it brought me supreme happiness. we ate the sauce with gnocchi and some freshly shaved pecorino and sauteed garlic spinach on the side. delish! and dinner literally took 5 minutes to make (boil water, add gnocchi, cook until floats to top, 2-3 minutes; warm sauce - 3-5 minutes; sautee spinach in olive oil & minced garlic 2 minutes. done!)I have a little leftover sauce so I'm going to try their white beans and sausage recipe this weekend!
Thursday, October 20, 2011
recommendation: roast some seeds
- scoop seeds out of gourd, pick out stringy parts and clean seeds (this is the most time consuming part)
- wash and pat dry with paper towel
- mix with olive oil (eyeball it, but just to coat, does not need a lot) and salt to taste
put on baking sheet in oven at 275 degrees and cook for 20 minutes or until first seed pops. they are a delicious, healthy and fiberful snack!
notes
* use sea salt, the chunky salt tastes awesome
* my mom used PAM spray instead of olive oil and said it worked just fine
(recipe adapted from here)
Wednesday, October 19, 2011
recommendation: easy halloween decorations
first off, halloween. since its approaching quickly and we don't have any kids, I figured I shouldn't go bananas on decorating indoors, I just wanted something fun for the front porch. i've been dying to spray paint pumpkins gold thanks to that Martha Stewart and also this blog that has a fabulous display of metallic gourds. I settled on two pumpkin pie pumpkins for the spray paint project which I picked out because they are tiny - so cheaper for the pumpkin and less spray paint. I used that blue painters tape to cover most of the stem but left a little showing because its hard to wrap completely! With the pumpkins placed on a tarp, spray away!! Quick and super easy!
On a spray paint high (from the fun, not the fumes - I wore a mask!) - I wanted to find more to spray paint. I was planning on using a silver sharpie to draw vampire faces on two empty wine bottles but decided to use them for a different project instead. Inspired by a post by Pure & Noble - I used a hot glue gun to write words on the bottles. I think elmers glue may have been easier but the hot glue dried super quick. I wrote JOY on one and PEACE on the other, vertically down the bottle. Waited a minute although the glue really dries quicker, and took them out to spray paint! I think they will be fun on my fire mantle with some decorative twigs coming out of them at Christmas time!
To set up my porch, I found some more great 'fun' pumpkins at a little fruit/vegetable stand on my trip Up North Michigan to Higgins Lake (family trip, SO much fun!). The green one is the Jarrahdale pumpkin. The peach one is called the Long Island Cheese pumpkin and both are edible although the Long Island pumpkin is supposed to be best for cooking/baking. I was also hoping to find some white pumpkins to put along with the gold ones but they are hard to find!!! The bale of hay I got from Meijer, a local grocery store for $4.99. Lastly the crate I got at a garage sale for $1. I've been using it to store things in my garage but worked out perfect for this look. I'm still on the hunt for a cornstalk which I will put in the corner and I think it OK to keep out until Thanksgiving so I will get good use out of it!
Happy spray painting! Here are some other helpful tips from blogger Becky Higgins if you decide to try it!
Wednesday, October 12, 2011
recommendation: an apple a day
1. apple nachos recipe from shugary sweets 2. apple caramel cake recipe - originally from Paula Deen but adapted by The Charm of Home 3. apple cider cocktail recipe - so easy! indulge... in all things apple! as they say...an apple a day keeps the doctor away... these are creative ways to get that apple in!!!
Saturday, October 8, 2011
recommendation: dry your own herbs
as for my beautiful basil - my sister plucked off bunches of it, rinsed, dried and transported it home so she could make pesto (see her recipe here)
my cilantro got pitched, it was really dried out from a hot summer
and...the thyme and oregano got dried! while I was taping up boxes, my sister cut bunches of each plant, tied them with knitting yarn and hung the bunches on hangers (p.s. the hanger is the most practical but how adorable is THIS?!). we let them hang for about 5 weeks (the original instructions I found online said 8-12 weeks but other websites said 5 days, 12 days, 2 weeks, etc., so I took them down when I noticed they were dry). This past week, I stripped the dried leaves from the bunches and put them into labeled bags. the thyme gave about a 1/3 cup, the oregano gave about 1/2 cup. i'm so excited to use my dried herbs! its such a great feeling to have watched a plant grow right in front of you and to be able to use it for your meals, it made me feel very resourceful. i used my dried thyme (only 1/4 tsp) in my Smitten Kitchen tomato soup this week and it was delicious.
next summer i think i will try to plant a lot more herbs, now that I know I can actually do something with them at the end of the summer so that nothing gets wasted!
Thursday, October 6, 2011
recommendation: tomato soup must-try recipe
this week i had leftover mozz, tomatoes and basil from a salad over the weekend so I decided to make our standby caprese sandwiches on ciabatta (mix italian spice mix with olive oil, brush onto two slices of bread, put in oven with mozz slices until it melts, add tomato and basil. done!). my new recipe adventure was to make HOMEMADE tomato soup since its one of my hubs favorites and the fall weather is just calling for it (despite the unusual 70 degree temps). i had saved an email from Smitten Kitchen for a recipe she had for Tomato Soup + Grilled Cheese all in one dish (think variation of french onion soup). I just made the soup portion (her version, not the original version she borrowed it from) but want to try the whole recipe sometime. it was amazing. her pictures are prettier but here's what i did:
Sunday, October 2, 2011
recommendation: tortilla pie
I found a recipe for tortilla pie through Martha Stewart. It was a tiny bit time consuming but it was a success! Hurray! The dish turned out very pretty so would be good to serve to guests and was delicious - I also liked that it seems adaptable, like you can add different beans, different cheese, and it will still turn out just as great. I served it with a salad that had corn (I had a leftover grilled cob that I sliced the kernels off of), avocado and tomatoes in it, nice and simple.
p.s. I also like that the recipe is coded in Martha's cookbook as a 'meat-less comfort meal' - makes me want to add a tab to my recipe binder with that category! Sometimes when I need a good veggie recipe (lent fridays, dinner with sister, etc.), my mind goes blank and all I can think of is lasagna...without meat, pasta...with meatless sauce, veggie burger, etc. Blah! Now i know what to make!!
Original Recipe
Notes: I didn't have a spring form pan so just used a pie dish, which takes away from its looks but not its taste!
Serves 6
Ingredients
4 flour tortillas (10 inches)
2 tablespoons canola oil
1 large onion, diced
1 jalapeno chile, minced (remove seeds and ribs for less heat)
2 garlic cloves, minced
1/2 teaspoon ground cumin
Coarse salt and freshly ground pepper
2 cans (15 ounces each) black beans, drained and rinsed
12 ounces beer, or 1 1/2 cups water
1 package (10 ounces) frozen corn
4 scallions, thinly sliced, plus more for garnish
8 ounces cheddar cheese, shredded (2 1/2 cups)
Directions
Preheat oven to 400 degrees. With a paring knife, trim tortillas to fit a 9-inch spring form pan. Use the bottom of the pan as a guide. Set aside.
Heat oil in a large skillet over medium heat. Add onion, jalapeno, garlic, and cumin; season with salt and pepper. Cook, stirring occasionally, until softened, 5 to 7 minutes.
Add beans and beer, and bring to a boil. Reduce heat to medium; simmer until liquid has almost evaporated, 8 to 10 minutes. Stir in corn and scallions, and remove from heat. Taste and adjust for seasoning.
Fit a trimmed tortilla in bottom of spring form pan; layer with 1/4 of the beans and 1/2 cup of cheese. Repeat three times, using 1 cup cheese on top layer. Bake until cheese melts, 20 to 25 minutes. Remove side of pan; sprinkle pie with scallions. To serve, slice into wedges.
Add a good salsa - I used verde. Enjoy!!
Wednesday, September 21, 2011
recommendation: pottery barn design studio
Sunday, September 18, 2011
recommendation: hot ham & cheese sandwiches
So here are some perks of these sandwiches
- they are super easy to make, quick recipe
- individually wrapped so you can throw a few in the oven as needed
- easy to change up - when I was little my mom made a mustard-less version for me. This weekend she made a meat-less version for my sister (instead of ham, we put tri-color pepper rings so it was similar to a cheesesteak hogie, minus the steak). You can also swap the swiss for something more adventurous - gouda? brie?
This blog post uses mayo (i think that part is unnecessary) and served them at a baby shower. I think her buns look great (I normally use plain hamburger buns). They are great for a sporting event or birthday party and are also pretty inexpensive!
Here is my mom/grandma's recipe:
Hot Ham & Cheese Sandwiches
1/4 # butter (# = pound!)
1/4 tsp worcestershire sauce
3 TBSP prepared yellow mustard
1 small onion, chopped
1 # shaved ham
3/4 # shaved swiss cheese
Soften butter, mix in worcestershire sauce, yellow mustard, onion. Spread this mixture onto hamburger buns. Add ham & Cheese. Wrap in foil, bake 350 degrees for 20 minutes. Makes 8-12 buns depending on size of bun and how much ham & cheese you pile on.
*I use I can't believe its not butter b/c its already soft. Also I Don't measure, just eyeball everything. Lastly, I use reduced fat swiss and have them shave the swiss & ham verrrrry thin, so its falling apart (yes, the cheese too).
Enjoy!
Monday, August 15, 2011
recommendation: THE BEST planner in the world
a few things. yes, i am excited about a brand new fresh planner (that same weird excitement the first week of school after you get over all of the awkward figuring out who you know in class and who will be your friend and where to eat lunch and can then concentrate on going through your syllubus and writing your name on all of your folders and getting everything organized and labeled)(wait)(is that not fun for anyone else?). and yes - I still use a planner designed for someone in school. lastly, yes, I still use a paper planner vs something online or through google (i use this too) or my iphone - there are some things that just need to remain untouched by technology and for me, my planner is one (as well as all books. my sister and her bf swear by the kindle but I just can't do it. it feels wrong.).
I also think it is a fun fact that I have been using this planner since 1999!!! They are my favorite and I always think its fun to pick out a color (they have a fun selection of about 5 that vary every year). Sometimes my sister and I accidentally pick the same color, which duh, is because of our sister ESP.
So anyways, lets get to the details. Made by Mixed Role Productions, this calendar is $16.95 plus tax and shipping. You can get it at some book stores - I get mine at Nicola's in Ann Arbor. I keep track of everything because of my headaches (diet, sleep, etc.) so I like that there is a lot of room for notes during the week, a folder with pockets, sections in the back for notes, graphs, contact information, etc. This planner has gotten me through 12 years which definitely warrants a blog post and a solid recommendation!
Saturday, August 13, 2011
recommendation: selecting your bridal party
Made me reminisce a little about our wedding – my sister was my maid of honor and did such a fantastic job of planning my bridal shower and bachelorette party. Every detail was perfect – at my bridal shower, my sister & mom found antique tea cups and saucers, each one different, and put one at each setting with a little flower arrangement in it. My favorite drinks, my favorite beverages, my favorite people – my pre-wedding events were perfect. On the day-of, our photographer captured a picture of us, giving each other a look of complete love and support. This is what a maid of honor is!
I hope that you find the perfect people to be in your wedding. They make the cutest cards these days so that you can send or give to your friend/relative to ask them to be a part of your special day. I love these I Still Need My Girls one and Will you be my bridesmaid, both from Etsy. Another popular idea is sending a small flower arrangement to each girl and in the card asking if they will be a part of your special day.
Most importantly is – as a bride, don’t assume they will want to or can, understand that you are asking them a huge favor – time, money, friendship and tolerance of you being a crazy b*tch during the last few weeks (thank you to my girls for loving me still!). And girls who are accepting – understand what you are accepting to – time, money, friendship, and tolerance of your friend being crazy. If you aren’t able to do this, think about accepting before you do it. Did anyone see the movie Bridesmaid’s? What a crazy collection of girls but it really shows that you have to be there for the bride – this is not about you, this is about her.
Here are some helpful articles and tips for selecting your bridal attendants:
- The Knot's, 9 Tips for Who to Pick
- Real Simple, Choosing your Wedding Party
- Bridesmaid 101, everything bridesmaids and MOH's need to know - duties, tips, resources
- Wedding Bee, bridesmaid board