Tuesday, November 27, 2012

recommendation: k-cups!

Are you a K-Cupper? I got my hubby a Keurig for Christmas last year thinking it was the silliest thing ever - we have a coffee pot, why do we need another one? But that's what Christmas is about - WANT gifts not NEED gifts, right? And 1 year later, I don't think I could live without it. I'm addicted!

Since we have a coffee pot downstairs in the kitchen - we put it in our bedroom as a treat (read: since I hate walking downstairs at 6:30am to make coffee and am a little lazy and want to pretend that I live in a hotel). Now he can make a cup when he's getting ready and I can make a cup when I get up. If I have the time, I like to sit in bed and slowly wake up with a cup of coffee. The other nice thing is, I really like flavored coffee and he does not, so we can each make our own flavors with no extra work! Its such an awesome treat having it up in our bedroom, despite the fact that the 2nd floor almost always smells like coffee.

It makes a great gift so if you have been thinking about it, I would recommend getting one! We have the Elite 40 which I purchased from Kohls because they always have 15-30% off coupons and if you buy during a Kohls cash time, you get free money for other gifts (or yourself!).

In terms of the actual coffee - no, this is not the exact same as a freshly brewed cup, and if you are super picky, I would suggest trying a cup from a Keurig before buying it. That said, there are all kinds of coffees out there - Folgers, Starbucks, Caribou, Dunkin Donuts, Green Mountain, etc. And each brand makes tons of flavors. Our favorites are:

- Starbucks House Blend
- Starbucks Blonde Blend
- Caribou Medium
- Dunkin Donuts Hazelnut

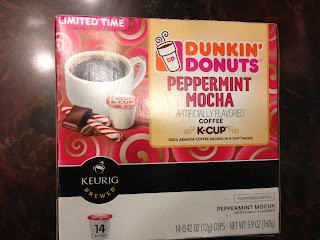
Right now, Dunkin Donuts has a seasonal k-cup - Peppermint Mocha. If you add a little milk and a spoon of sugar, it taste like the real deal! Note: Dunkin Donuts K-Cups are sold at Dunkin Donuts locations only, not at stores or online (except for sketchy websites). They had a pumpkin spice one in the fall that was nice too. Keurig's website has 250 different types of beverages for the Keurig machines - coffee (regular & decaf and half-caf!), teas, apple cider, hot cocoa, even iced beverages that are meant to be brewed straight into a cup of ice.

In terms of cost, it comes out to under $1 per cup (between $.65 - $.95 depending where you buy, which brand, etc). Now brewing coffee from a bag of grounds or beans is definitely cheaper. But if you don't want all that effort, but want to save money from stopping at a coffee shop every day, then this seems worth it. Caribou is less expensive than Starbucks, and in my opinion, just as good. They also sell k-cup packs at Bed Bath & Beyond where you can use 20% off coupons, but they are often on sale at my local grocery store.


Happy brewing!

Wednesday, October 31, 2012

recommendation: fun halloween decor

Happy Halloween!

I had so much fun with my Halloween decorations last year (here and here), I wanted to do something again this year. I decided to try two projects - a glitter pumpkin and some fun letters for my plants.

I earned the nickname Miss Sparkle at my summer job in college at Urban Outfitters, but don't be fooled... I am not a fan of glitter. I do love all thinks sparkly, I just don't want to touch them. Don't you hate when you touch something glittery and hours later, look in the mirror and realize you have little sparkles all over your face?! That said, I am not completely opposed to it. I was in the clearance aisle at Michaels and found a GIANT bottle of orange glitter for .75 cents... I cannot pass up a bargain, so decided to try my hand at a glitter pumpkin.

I think glitter spray paint would have worked much better but I had glitter, so I started by using mod podge on the pumpkin. I'm sure spray glue would have worked just as well. I did it in sections and sprinkled the glitter on. Waited about 20 minutes for it to try and then sprayed the whole thing with a spray paint clear gloss, that sealed the glitter so I would not have to deal with it coming off!

I'm happy with the result, but not thrilled so decided to only glitter one pumpkin. The other, I just tied a bow on, and all seemed well until I found a giant chunk missing from the pumpkin... I blame Mr. Toffee.

P.S. Yes, that hay is from last year, it was $5 and kept fine in the garage for a full year!

My next project was to add something to my boxwood plants to make it a little more festive. I needed 2 short words, so decided on B-O-O and E-E-K. I got wooden letters from Michaels and spray painted them orange. I then glued together two wooden kabob skewers, spray painted them black, and hot glued them to the letters. It was an easy and inexpensive project and I'm super excited about how it turned out!

P.P.S. I do CUTE halloween - not sexy or scary! SO BOO! HAPPY 31ST!

Friday, October 26, 2012

recommendation: recipe repeat - must try tomato soup

I originally posted about this recipe a little over a year ago and I can't tell you how many times I've made it since. I'm posting again about it because its just such an awesome soup recipe. And soup is not always satisfying. But when you eat this along with a grilled cheese, its a good meal. Since you roast the tomatoes, its ok if they aren't completely ripe and perfect, especially since its a little after tomato season. Roasting them gives them great flavor. We like the soup spicy so I add double the amount of red pepper flakes but if you like mild spice or are making this for kids, just keep the amount as is (or leave it out).

Here are my tips:
- don't skip the garlic, it adds a lot of flavor
- don't blend the tomatoes too much. food processor or blender both work, but pulse so its a chunky puree
- the recipe calls for chicken stock, which I think is best (why? see here), but I used chicken broth the other night and it was just as good. Veggie stock can be substituted as well
- garnishes are nice - freshly torn basil, oyster crackers or shredded cheddar are all great!

Original Recipe from Bon Appetit
I found it at Smitten Kitchen
My Original Post

Roasted Tomato Soup with Broiled Cheddar

Serves 4 (though closer to 6 if served in mugs)
3 pounds plum tomatoes, halved lengthwise (apx 9-12 tomatoes)
2 tablespoons olive oil
2 large or 4 small cloves garlic, unpeeled
1 teaspoon finely chopped fresh thyme leaves or 1/4 teaspoon dried
1/4 teaspoon (or more to taste) dried crushed red pepper (I use 1/2 tsp)
4 cups chicken or vegetable stock

Preheat oven to 400°F. Wrap garlic cloves in a tight foil packet. Place tomatoes, cut side up, on large baking sheet. Sprinkle generously with salt and pepper (I used 1 full teaspoon of Kosher salt). Drizzle tomatoes with olive oil. Add foil packet of garlic to tray. Roast until tomatoes are brown and tender (garlic will be very tender), about 1 hour. Cool slightly.

Unwrap garlic packet and peel cloves. Transfer cloves, tomatoes and any accumulated juices to a blender or food processor and pulse machine on and off until tomatoes are a chunky puree.

Transfer tomatoes to medium pot and add thyme, crushed red pepper and stock and bring to a boil Reduce heat to a simmer and cook, uncovered, for 25 minutes. Remove from heat and adjust seasonings to taste.

Make ahead: Soup can be prepared one day ahead, and kept covered in the fridge. Rewarm before serving.

Friday, October 12, 2012

recommendation: easy and inexpensive fall decoration

I wanted to find some fall decorations for September and the beginning of October before I pulled out my Halloween decorations. I saw a version of this on Pinterest and thought it would be easy to make!

I had checked a few places for the dried beans and lentils... my local grocery store had some but they were more than I wanted to spend ($3 for a bag). The Dollar Store had some but the red ones were ashy and faded and they didn't have white, green, or popcorn. Then I checked Walmart and ta-da, they had exactly what I needed! I purchased their Great Value brand and each bag was just over $1 each and I purchased two bags of each. I got split peas, kidney beans, small white beans and popcorn kernels.

The best prices I found for a large vase with lid or large hurricane vase were:
- HomeGoods - they had large hurricanes for $12.99 each
- Walmart - they had medium hurricane for $14.99 - $17.99

I lucked out and my mom had a leftover one from our wedding 4 years ago in her basement so I stole it. But the price tag on the bottom said TJMaxx, $14.99 so I think places like that are your best bet to find a nice sized vase. Or Thift stores of course!

From there I just chose an order, started pouring beans in, layering 2 colors then putting the candle in, and finishing the layering. I also added a twine ribbon around the outside.

I'm pretty happy with the outcome, its an easy and inexpensive project!

Speaking of fall, these Caramel Apple Cider Cookies are on the agenda for today. I made them last year, they are awesome...but NOTE: either eat them all out of the oven (ha! don't really! share them!)...or heat each cookie in the microwave for 5 seconds before eating. The caramel in the middle hardens up when the cookies are cooled and they are meant to be soft and gooey. Enjoy!

Original Pin:

Friday, September 28, 2012

recommendation: easy DIY jewelry organizer

I've mentioned before how easily I get distracted, but often great things come of this - remember my spray paint project in the middle of cleaning the garage?

Well this morning one thing led to the next and before I knew it, I had set out to get dressed but ended up organizing all my accessories starting with my under garments, then shoes, belts and hats, and moved on to my jewelry drawer. To be honest, I don't know how long those things will stay in their new spots, but it looks pretty awesome now. While cleaning out my jewelry drawer, I realized I have a LOT of amazing jewelry, including some really neat 'statement' necklaces. I always forget about them stuffed away in my drawer so I got to thinking... I need some way to keep them out without it looking messy. And then from there, this is what my brain thought:

-> Oh! I saw a bulletin board organizer on pinterest once!
-> walk down to basement... do I have an extra bulletin board? YES!
-> Hmm...spray paint or cover in fabric?
-> up stairs to garage, don't like my spray paint color selection for this
-> do I have fabric? back downstairs.
-> This should work. I guess. Do I want to wait? Not really. So we'll make it work.
-> Look up bulletin boards on pinterest.
-> Iron Fabric
-> lay reverse side down on board and trace square to cover with pen
-> cut fabric and hot glue corners down to board
-> pull out old acrylic paint collection - select gold color, paint edges
-> wait 30 minutes
-> back downstairs to find T-PIN push pins
-> AND.....

VOILA! This was no more than a 45 minute project and that was all because of the stair walking and paint drying time. Sometimes my random tangent projects are totally worth it!!! the only two things I would do differently next time are: 1) select non-fraying fabric - like canvas or cotton. Mine was fraying as I was cutting the edges and got a little messy and uneven. 2) do not put hot glue down, then lay out fabric - glue will harden. lay fabric down, then peel up each corner and put glue down. I only glued corners since fabric was thin and I didn't want bumpy glue showing through.

P.S. Yeah... I know I have a lot of perfumes. And yes, I wear (almost) all of them. My favorites right now are Chloe, Ralph Lauren Blue (although this is a bit summery), and a Marc Jacobs rollerball that I don't think Sephora makes anymore.

Friday, August 31, 2012

recommendation: sneaky mashed potatoes

I feel like I'm living on the edge... I did something sneaky... are you nervous? Ha! You all know me. I'm miss goody two-shoes. You will laugh when you find out what it actually is. Ready? I snuck....cauliflower into my mashed potatoes. HA! SNEAKY, right?

I found this recipe a while back and it was a hit. I didn't tell my husband what I did and asked him how the dinner was and if he liked the potatoes and barely able to contain myself, when he said yes, I basically yelled HA!I-TRICKED-YOU!THERE-IS-CAULIFLOWER-IN.THE.POTATOES!MUUUHAHHA!

This recipe may not be a substitute for thanksgiving day mashed potatoes, a sacred and traditional dish... but it sure does make you feel less guilty when you want some of that creamy starchy goodness on a weeknight.

Here's the problem. I lost the recipe. I checked my recipe binder, pinterest, both email accounts... nothing. I could look up a new recipe but there were too many variations, so... I made up a new one. This is called, 'winging it.'

Items you need: 4 small or 2 big potatoes, 1 head of cauliflower, butter/margarine, ff half and half, salt & pepper to taste.

Fill big pot with water
Cut a few peeled russet potatoes into thirds
Put potatoes in water
Bring water to a boil

After 10 minutes check potatoes. When potatoes are soft enough you can put a fork through them - but NOT soft enough that they are mashable - add chopped up cauliflower. One full head.

Boil until both are mashable (read: soft, mushy, whatever).

Drain water, mash potatoes and cauliflower. Add cheese (I always have cheddar on hand), a little butter or margarine, and some fat free half and half. I also add in garlic salt and pepper to taste. Obviously there is room for adjustments, personal preferences, do whatever tastes right. Next time I might try putting less potato and more cauliflower... you really can't tell much of a difference. Stir and enjoy!

Tuesday, August 28, 2012

recommendation: no-fry fries

I am not great at making french fries from scratch. They always turn out mushy and I never knew why. I did discover that they need a higher heat at 425 or 450, when I used to cook them at 350 degrees. Well, I stopped making them and started buying them in the frozen section, that Alexia brand makes good fries, but they are always expensive!

Last week I found an article that included Gwyneth Paltrow's version. I love most things Gwyneth - her friendship with Beyonce and Jay-Z, her version of Betty Davis Eyes from Duets, her website GOOP, and the girl can cook. So I decided to try it the next day. I had no idea a simple bowl of cold water could change my fry world. Various sources say that soaking the potatoes in cold water before cooking will remove excess starch.

The recipe as listed on self.com does not list how long to soak the potatoes but I think I left them in more than 5 but less than 10, so lets go with 8 minutes.

Recipe courtesy of My Father's Daughter: Delicious, Easy Recipes Celebrating Family & Togetherness by Gwyneth Paltrow

INGREDIENTS
- 2 large russet potatoes (2/3 lb each), peeled
- 2 tablespoons olive oil
- 3/4 teaspoon coarse sea salt

PREPARATION
Heat oven to 450°. Cut potatoes in half horizontally; cut each half into 1/3-inch-thick fries and place in a bowl of cold water. Remove from water and dry thoroughly. Toss with oil and sprinkle with salt. Place fries on a cookie sheet. Roast until browned and cooked through, turning occasionally, 25 minutes.

Nutrition: 175 calories per serving, 7 g fat (1 g saturated), 27 g carbs, 2 g fiber, 3 g protein

p.s. that's a veggie burger you see in the background. we've been enjoying this new brand, Lightlife. I don't know if they are better than MorningStar but its nice to have a change and they are less expensive. I buy the Farmer's Market Veggie Burgers.

Wednesday, August 22, 2012

recommendation: tips for hardboiling an egg

I thought of Julia Child recently. Admittedly, I only know her though Julie & Julia (the movie)... I have none of her cookbooks and I cannot recall any of her TV episodes. But how must she have felt as she pioneered through and mastered basic and expert culinary skills and recipes?

Well that's a lot of thought for such a simple task. All I was doing was boiling my first egg. It was pretty exciting. Until it came to peeling it. I was scared of that, I have no idea why. The smell also got to me. It was for my husband (to put in salads for lunch at work) so he peeled it. I was also terrified that he would peel it open and the yolk would be runny. But overall, mission successful. It got me thinking, what else do I need to know about boiling an egg?

I found this great chart from What's Cooking America:

Egg Size / Degree of Doneness / Time Required:
- Medium / Soft-Cooked yolk / 3 minutes
- Medium / Medium-Cooked yolk / 5 minutes
- Medium / Hard-Cooked yolk / 12 minutes

- Large / Soft-Cooked yolk / 4 to 5 minutes
- Large / Medium-Cooked yolk / 6 minutes
- Large / Hard-Cooked yolk / 17 minutes

- Extra Large / Soft-Cooked yolk / 5 minutes
- Extra Large / Medium-Cooked yolk / 7 to 8 minutes
- Extra Large / Hard-Cooked yolk / 19 minutes

My mom also gave me a great tip - to use slightly older eggs. As this site says, "Extremely fresh eggs are not recommended when making hard-boiled eggs. They are very difficult to peel."

Here are some more tips:
- Bring eggs to room temperature before cooking
- Refrigeration is necessary for hard boiled eggs if they eggs are not to be consumed within a few hours
- Hard-cooked eggs in the shell can be refrigerated up to one week
- 1 large boiled egg has 75 calories and 6.29 g of protein (it says here that the average American needs between 50 to 65 g of protein per day)

I can't believe these things got a whole blog post, I don't know if I'll ever eat one and I hate the smell... but I figured if I learned something while trying this new cooking task, maybe you can too!

Thursday, August 16, 2012

recommendation: homemade air freshener

The electrician was due any minute this morning and I realized that something smelled funny in my kitchen... my fridge? My garbage disposal? My trash? I had to think quick and I the only spray I had was for a bathroom and I don't want that in the kitchen. Recently I tried a suggestion from Pinterest for air freshener and it worked out nicely so I did it again this morning and I think it was a great solution!!

Pre-heat oven to 300 degrees. Take 2 caps of vanilla extract and put in coffee mug that is oven-safe. Put mug in oven for 1 hour. I put my mug on a tray so its easier to get out. After an hour, the extract hardens up in the mug so its kind of pointless to leave it in much longer. It takes about 15 minutes for the scent to start spreading.

Its a great quick fix, apparently realtors do this for open houses! My only other recommendation is to let your Other know you are doing this so they don't come home and think that you are baking a cake... that is disappointing!

Original Pin:

Tuesday, August 14, 2012

recommendation: make your own taco seasoning

Well geez, if I had known it was this easy, I probably would have been doing this a long time ago. I recently saw a recipe for making your own taco seasoning and my first thoughts were 1. its like a dollar or less for a packet of seasoning. and 2. I buy the low-sodium one, so we're good, right?

And then for dinner tonight, I forgot the store-bought seasoning. So I was forced to make my own. And like I said... if I had know it was this easy...Here you go (original recipe found here):

- 1 tablespoon chili powder
- 1/4 teaspoon garlic powder
- 1/4 teaspoon onion powder
- 1/4 teaspoon crushed red pepper flakes
- 1/4 teaspoon dried oregano (I only had ground so used 1/8 tsp)
- 1/2 teaspoon paprika
- 1 1/2 teaspoons ground cumin
- 1 teaspoon sea salt
- 1 teaspoon black pepper

They are all things most people have in their cupboard anyway! Mix it all together. That's it. Easy peasy, huh? I poached then shredded one chicken breast (.80 lbs) and then heated it with some oil, onions and about 1 TBSP of this mix and then added a little water while it simmered and we made tacos.

ENJOY!

Thursday, August 9, 2012

recommendation: what's good at Trader Joe's

Is it raining where you are? Its pouring here and is much needed, we've had a dry summer! Seems like the perfect day to catch up on reading emails & articles that you've been putting off for a rainy day! So I'm going to add one to your list. My grandma sent me this awesome article from Huffington Post, Sweet Finds And Major Disappointments At Trader Joe's. The article is about this couple, Nathan and Sonia and their friends Russ and Sandy, have decided to go through Trader Joe's inventory and rate the products on a 1 - 10 scale with complete reviews, and then blog about it.

Trader Joe's is sometimes similar to Pinterest, it sucks you in with the pretty packaging and prices, but its not always worth it. Don't get me wrong, I'm a huge Trader Joe's fan and think this store is absolutely amazing. I would probably shop there way more often if there wasn't construction going on my route to get there. But one person cannot possibly like every single thing they have in the store so its nice to know in advance about how a product is so that you can decide if you personally will like it.

The site has categories on the lower right so you can check out products by type - Appetizer, Dinner, Condiment, etc. Check out their website, What's Good at Trader Joe's, I think it will prove to be helpful. Enjoy!

Wednesday, August 8, 2012

recommendation: pasta-less lasagna

In this household, we are carb-friendly. Love them. So when my hubby said these words "lets try to eat less carbs", I was like, uhhhhh, whaaat?!? Whyyyy? How?

And then a day later, this recipe serendipitously popped up in my Pinterest feed: No Noodles About It – The Best Low Carb Lasagna!. So there it was.

To make a good lasagna, you have to put a little time and love into it. Since I don't like to waste resources on Pinterest recipes since they are so hit or miss, I decided to take a major shortcut and make a few changes. So here is my revised recipe. For the original directions, see the recipe from the blog Dashing Dish.

For the Noodles:
5 large Zucchini, cut lengthwise into 1/8 inch strips (I used a cheese slicer) Put zucchini slices in colander and sprinkle with salt so that the vegetable can sweat out the water. Dab down the slices with a paper towel.

For the Meat Sauce:
This is where I cheated! I used a 32 oz jar of Mids Sausage Sauce (and a tiny bit of leftover meatless because I like my pasta with lots of sauce). The original recipe calls for you to make your own meat sauce.

For the Cheese Layer:
1 15oz container light ricotta cheese
1/2 cup Shredded parmesan cheese
1 cup Shredded mozzarella cheese
6-8 leaves of basil, minced

Instructions: 1. Preheat oven to 425 degrees. Spray a cookie sheet with non-stick cooking spray, arranging dried out zucchini. Bake slices for 5 minutes, then remove from oven, flip, sprinkle with pepper, and bake 5 more minutes. I left the salt out of this step b/c I had salted the zucchini earlier to sweat out the water. Remove from oven and set slices aside. (Note: I baked 3 cookie sheets of zucchini for this, which made about 3 layers of lasagna). Lower oven to 375 degrees.

2. Insert directions for making your own sauce....or... Open Jar of Sauce.

3. Mix the ricotta, parmesan and minced basil.

4. Spray a 9 x 13 baking dish with cooking spray and spread some of the meat sauce in the bottom of the pan. Then put a layer of zucchini slices, followed by a layer of the cheese mixture. If this doesn't spread easily, just sprinkle it. Repeat layers until dish is full... sauce, zucchini, cheese. repeat.

5. Sprinkle mozzarella on top, cover with foil and bake at 375 degrees for 1 hour.

6. Remove foil, bake for another 5-10 minutes until the cheese is browned. Remove from oven and let it rest for about 10 minutes before slicing. It may be tricky to slice, use a sharp knife and just jiggle it through. You can use a spatula... but the lasagna doesn't really serve in 'pieces'... its quite saucy, but its delicious. Worth trying!

Enjoy, and don't feel too guilty, its low-carb! :)


{Original Pin - No Noodles About It ~The Best Low Carb Lasagna Ever!}

Thursday, July 26, 2012

recommendation: re-use, up-cycle, spray paint!

I have the attention span of a 2 year old. Seriously. We were in the middle of fixing up our garage - this is a big project. Everything peeled away from the walls and in the middle, painting the garage, sweeping. My sister-in-law is spray painting dresser drawers, it was a hot and sweaty day, motivation is not going to last all afternoon... I'm supposed to be painting, or moving things off the wall, or doing something, and then I spot my chalkboard spray paint. So obviously instead of staying on-project and putting it away, I think... what can I spray paint?!

I had saved the plastic containers our plants for the front yard came in (I swear I'm not a hoarder!), knowing that I would find some project with them. They are fairly flimsy as they are meant to be disposable, but here's what I did. I washed them out and let them dry in the sun. Taped down a rectangle on each one and spray painted them with chalkboard spray paint. Waited about 30-45 minutes to be sure, peeled off the tape, and whipped out my galaxy marker and traced the rectangle and polka dotted it up (the world is a happier place because of polka dots). What is a galaxy marker? If you are a crafter, you need this. Its like a paint marker, in that it writes on any dark surface. Its awesome. White is my favorite.

And... TA-DA!

So, I re-used and up-cycled these buckets, therefore justifying my pack-rat habits (in this one instance) and turned them into garage storage containers for all of the other crap I insist on saving...but at least they look pretty & organized! Now I just need to find chalk markers that erase easily... any suggestions? I'd like to purchase them at Michael's (b/c of coupons) or Amazon (because of their great prices). I almost bought some on amazon but reviews said they don't erase well so looking for word of mouth recommendations! On to the next spray paint project... a salvaged chair - will post soon!

Friday, July 20, 2012

recommendation: cake batter muddy buddies

My friend's daughter was having her 3rd birthday party and I volunteered to make the puppy chow (aka muddy buddies) she planned on having (along with scooby snacks, which taste suspiciously like cookie butter....). So cute for a Clifford the big red dog themed party! She mentioned that she had cake batter puppy chow one time so I knew I had to find this recipe. It was just as easy to make as your normal chocolate/peanut butter version but a little more festive with sprinkles in it! I made 1.5 batch of the chocolate and 1 batch of the birthday cake version and 2 boxes of chex was the perfect amount with just enough left over for a bowl of cereal the next morning!


I got my recipe from Chef In Training:

CAKE BATTER MUDDY BUDDIES
recipe adapted from: So Very Blessed

Makes 5 cups

5 cups Chex cereal (I used half rice half corn)
10 oz (5 squares) vanilla flavored Almond Bark
1 1/2 cups yellow cake mix
1/2 cup powdered sugar
vegetable shortening, optional (I skipped)
sprinkles (LOTS OF THEM)

- Pour 5 cups of Chex Cereal into a large bowl.
- In a large bag, put cake mix and powdered sugar and shake to mix evenly. (*Note, I stirred my sprinkles in here so they would stick to the chex too but the recipe calls for them to come in 2 steps... your choice)
- Melt Almond Bark according to the package directions, adding vegetable shortening to thin if desired.
- Pour Almond Bark over cereal, stirring and folding until the cereal is completely covered. Stir in some sprinkles if you would like.
- Pour the Almond Bark covered cereal into the large bag containing cake mix and powdered sugar. Zip up the bag and shake until all the cereal is coated with the powdered mixture.

Sorry no picture of the actual product, they were eaten quickly. I still prefer the chocolate version but they were a hit at the party. Even Murphy the dog got into them...although he is excused, to be fair, we did call it puppy chow and Anne did display it in dog bowls (from the dollar store!). I can see in dog world how this would be confusing.

Pin of Original Recipe (don't you envy people who think up these things in their kitchen??)

Tuesday, July 17, 2012

recommendation: crockpot Indian dish

Well my quest to make a new Indian dish every two weeks has failed but I'm still trying to fit Indian food in the rotation every now and then. Some Indian food is time consuming (unless you make it THIS way)!

I decided to give this Chicken Tikka Masala crock-pot recipe from Real Simple a go, and it seemed pretty simple. I love crock pot meals on the days I go to visit my Grandma because I'm normally gone the whole day so when I come home, dinner is almost done, whoo hoo! The recipe was pretty good - a little more tomato-y than Indian-y but I think that 1. this is good for people who are new to trying Indian food and 2. It was just so easy that I would make this again based on that. Here are my comments:

Notes:
- I used minced garlic instead of chopped cloves. Remember - 1/2 TSP MINCED garlic = 1 TSP CHOPPED Garlic = 1 WHOLE Clove
- Garam Masala is hard to find, most normal grocery stores don't have it. You'll probably have to visit your local Indian or ethinic foods grocery store (A2 and Chicago, see my store suggestions here) or order it on Amazon (although it will be MUCH cheaper in a grocery store)
- I added "JEERA" which means Cumin to my cucumber salad. I only use ground roasted cumin as I'm not a huge fan of the whole seed. To make it, roast the seeds in a skillet over medium-high heat until they darken, watch carefully so they don't burn. Then grind them in a coffee grinder - I HIGHLY suggest you have a separate spice grinder as this spice has a strong smell and you don not want your coffee beans tasting like cumin!! The seeds should grind into a dark brown powder. I use this when recipes call for cumin but use a little less as its a stronger flavor.

Ingredients
1 15-ounce can crushed tomatoes
1 medium onion, chopped
2 cloves garlic, chopped
2 tablespoons tomato paste
2 teaspoons garam masala (Indian spice blend)
kosher salt and black pepper
1 1/2 pounds boneless, skinless chicken thighs (about 8)
1/2 cup heavy cream

1/2 English cucumber, halved and thinly sliced
1/4 cup fresh cilantro leaves (I left this out, didn't want to spend the money and I don't like cilantro!)
1 tablespoon fresh lemon juice

1 cup basmati or some other long-grain white rice

Directions
- In a 4- to 6-quart slow cooker, combine the tomatoes, onion, garlic, tomato paste, garam masala, ¾ teaspoon salt, and ¼ teaspoon pepper. Place the chicken on top of the vegetables, cover, and cook until the chicken is tender, on low for 7 to 8 hours or on high for 3 to 4 hours (this will shorten total recipe time).
- In a small bowl, toss the cucumber and cilantro with the lemon juice and ¼ teaspoon each salt and pepper. Cover and refrigerate for up to 8 hours.

- Twenty minutes before serving, cook the rice according to the package directions.
- Just before serving, stir the cream into the chicken tikka masala. Serve over the rice with the cucumber relish.

We ate with a lot of veggies and had smaller servings of the actual chicken and rice. I had my beet salad (from Plum Market), a fresh mango, and some roasted cauliflower (chop up, toss with olive oil or spray with Pam, salt, pepper, curry powder and ground roasted cumin (recipe above), roast in oven on 425 for 30 min. p.s. if you are ever wondering how to pronounce this, its Chicken Tikka (TEE-KA) Masala (MAS-ALL-AH).

ENJOY!


Original Pinterest PIN:

Friday, July 13, 2012

recommendation: grocery store Plum Market

In Chicago I had no strong allegiance to a grocery store - I would go wherever convenient, and rotate between Trader Joe's (best frozen meals, herb prices, pre-marinated meat, and jarred sauces), Jewel (cheapest overall, inexpensive flowers, good cheese section), Dominick's (good produce, bakery and salad bar), and Whole Foods (best produce, hot food & salad bar, ready to eat foods, etc.) and even Sky Grocer our neighborhood store (which prices are SKY HIGH but its a beautiful store and saved me in a few cooking binds).

Here in Michigan, I'm fiercely loyal to Busch's. They are the closest to me but really, it comes down to more. Their store is always clean and stocked, there are samples, everyone (literally everyone in every department) is friendly and helpful. Their prices might be more than Meijer or Kroger, but they are less than Whole Foods and I feel like they sell quality products that make it worth it.

OK but this post is not about my love for Busch's, ha! Its about another fantastic grocery store that is in Ann Arbor and that is coming to Chicago! PLUM MARKET! I'm so excited for my fellow Chicagoans to experience Plum.

They are a high-end grocery store, similar to Whole Foods but much smaller. I've been thinking for the past few days about what makes them different - they too source local products, are heavily organic, offer health options, have premade foods and a great salad & olive bar... and then I learned that they have a reason to be similar:
Matthew Jonna and Marc Jonna are third generation retailers who grew up working for their father’s store, Merchant of Vino Marketplace, a natural, organic, and specialty food and wine store with six locations across the Midwest. The chain attracted significant attention from competitors and in 1998 Whole Foods Market acquired the company. Both Jonna’s continued to work with the Whole Foods Market executive leadership team. Matt and Marc left Whole Foods Market to pursue developing a new grocery concept, later to become Plum Market....

Plum is opening in Chicago in Spring 2013, so sorry to get you prematurely excited, but I need you to all be aware so that when you start seeing signage and construction in Old Town, you know what's coming. It'll be located at 1233 North Wells, Chicago IL 60610.

Another reason I'm excited is because Plum is Zingerman's product-heavy, so I'm hoping this brings more Zingerman's to Chicago!

I debated whether this blog post should be about the store or my favorite dish from Plum, so I'm combining them. Let me tell you about my love for... their BEETS. Beets are a weird vegetable. My only experience of them were as a kid at Easter, seeing hard boiled eggs pickled in beet juice.

As an adult I tried them but didn't get it. They tasted kind of dirty, you know? I have a friend Brianna that loves beets, and since I adore her, it made me want to love beets more. And my friend Anne's 3 year old daughter was eating them when she was 2 so I figure, if she can eat them, why can't I? I tried them at a fancy restaurant and they weren't so bad. So when my mom brought home this beet salad from Plum Market, I was open to trying it. I can't explain to you how UN-BEET this salad is. They taste so...clean! And fresh and pure. They are oven-roasted red beets with thinly sliced red onions in red wine vinaigrette. Its awesome and addictive (and expensive - beets are kind of heavy and its from the salad bar that's charged by weight, so you have been warned). If you like beets or are willing to try, check this dish out.

Wednesday, July 11, 2012

recommendation: davanti enoteca

Let me tell you about a place that sparkles, day and night. No matter what meal you go to Davanti Enoteca for, the restaurant just has this atmosphere that catches you - this place is a neighborhood gem. Located at 1359 W. Taylor in University Village in Chicago (that's South of West Loop and West of South Loop!), nothing draws you in from the outside, but once your in, the exposed brick, chandeliers and wine racks put out a good vibe.

Hubby and I went here in July of 2011 for Brunch. Ignore the sleepy eyes, their coffee and food woke me right up!

We ordered the special of the day which was a fresh asparagus and swiss fritatta that came with a big pile of lemony arugula on top. Delish!

Like I wasn't making your mouth water enough, we also got a sweet dish. (TIP: if you get this dish, order it first, even before ordering other dishes, it takes a while to make). This Red Eye reviewer wrote it best:

"the calzone di frutta ($10) is a crusty sugar-kissed pocket of dough with steamy cinnamon-y apples and plump cherries inside. A generous dish of mascarpone whipped cream for topping was so simultaneously light and rich that it took all my composure not to lick the leftovers from the bowl."

Can't make brunch? You don't find a lot of places that have breakfast - dinner (and a bar) and each time of day is equally great. Well their dinner is just as amazing. My sister and her boyfriend took my mom and I here while we were visiting. They recommended 8-10 dishes for 4 people but as we had 2 larger items we went with 6. We started off with ricotta cheese presented in a mini mason jar with fresh honeycomb and toast crips to spread it on ($6).

Next up was Craig's recommended dish which we all absolutely loved. Focaccia di Recco ($15) is a baked focaccia bread with fresh soft cow cheese. The focaccia bread was thinner than a traditional one, I think because it was stuffed, but was still filling. This is a must get! The cheese has a strong taste but in a good way.

The pasta we ordered was called Cacio e Pepe ($9), its spaghetti noodles with pecorino and black pepper. This dish was nice and simple which was nice since a lot of our dishes had strong flavors.

I think if the salad we got had a lot more of the dressing (lemon and chili oil) on it, it would have been a bit better. It was beautiful but the shaved hearts of palm ($10) were a bit bland on their own.

Our grilled hanger steak ($17) was delicious but almost didn't taste Italian! It was a nice addition to the meal though. Served on a bed with oyster mushrooms and rhubarb with a salsa verde.

Ok, last but not least we got a pizza! We got the Pizza con Prosciutto e Rucola ($14) minus the Prosciutto for my veggiehead sister. We love arugula and it tasted great on the pizza. Points for cute presentation on a tomato can!

Like its not obvious enough, if you are in the Chicago area, this is a restaurant worth trying! The owner, Scott Harris, is the genius behind the Mia Francesca restaurants AND purple pig! And if you go at night and need a sweet treat after, stop by Mario's Lemonade Stand to get a frozen lemonade (comes in many flavors). ENJOY!